Lathe
1 Introduction
Lathe is considered as one of the oldest
machine tools and is widely used in industries. It is called as mother of
machine tools. The first screw cutting lathe was developed by an Englishman
named “Henry Maudlay” in the year 1797. Modern high speed, heavy duty lathes
are developed based on this machine.
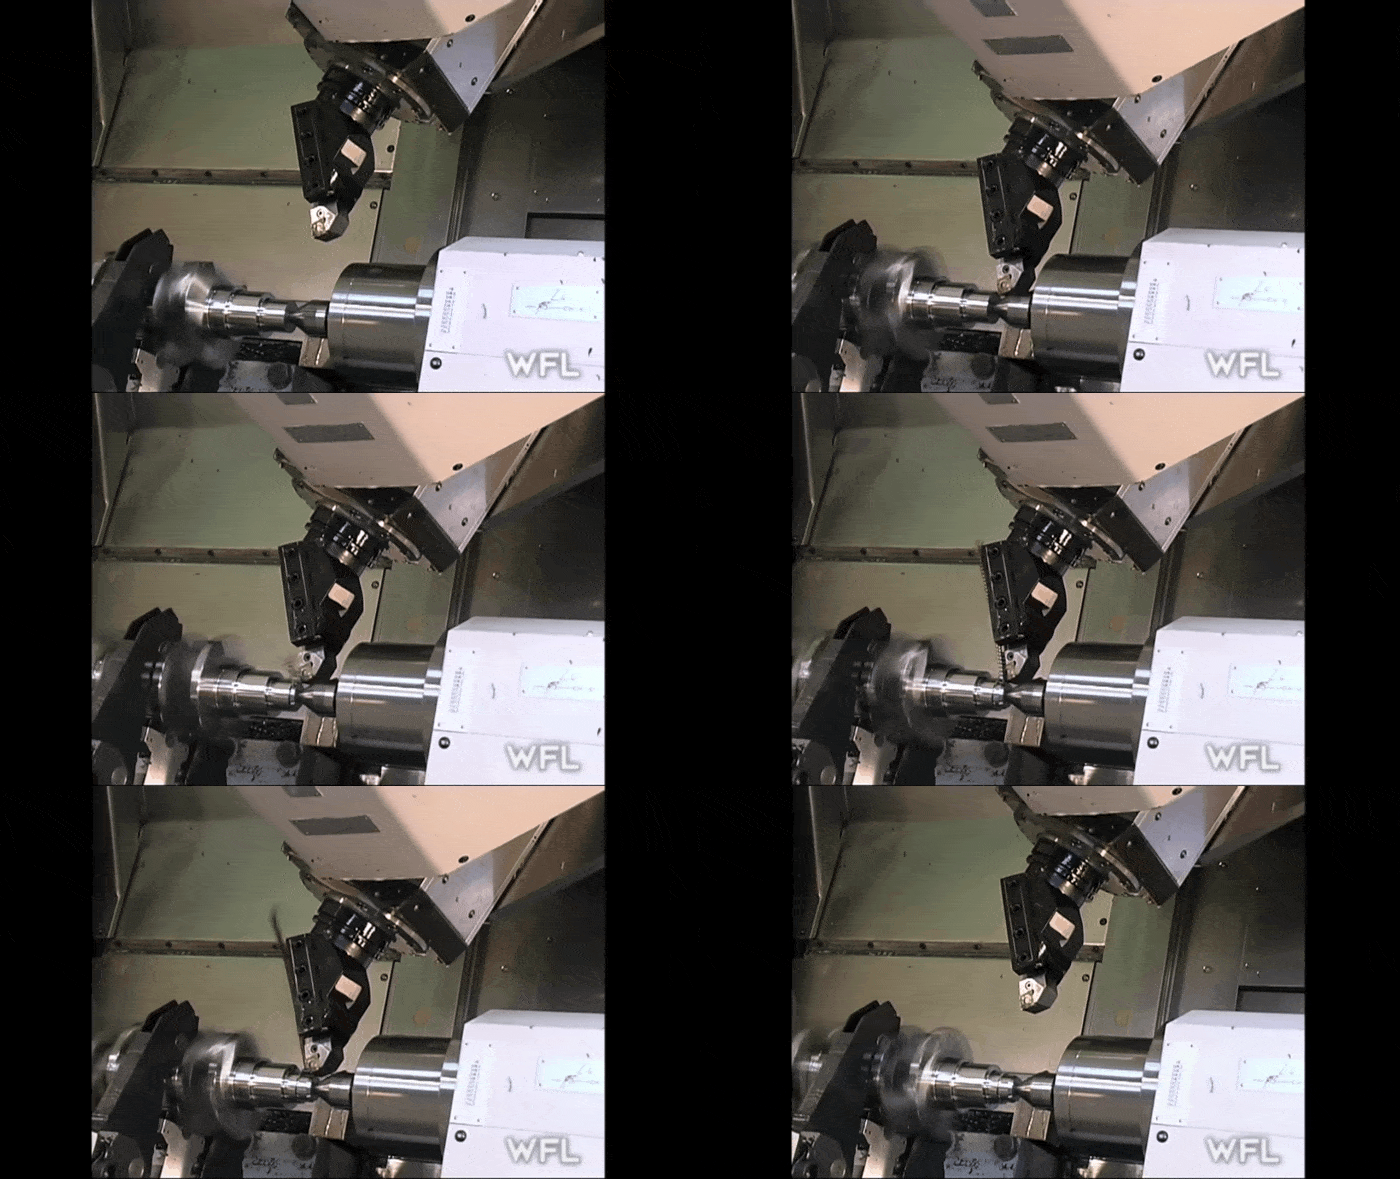
2 Turning
The
primary task of a lathe is to generate cylindrical work pieces. The process of
machining a work piece to the required shape and size by moving the cutting
tool either parallel or perpendicular to the axis of rotation of the work piece
is known as turning.
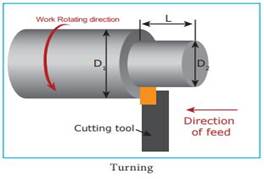
In this process, excess unwanted
metal is removed. The machine tool useful in performing plain turning, taper
turning, thread cutting, chamfering and knurling by adopting the above method
is known as lathe.
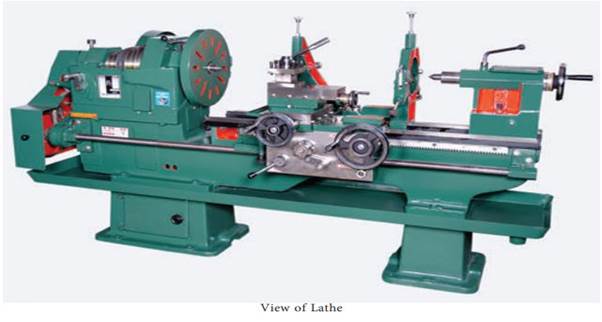
3 Structure of Lathe
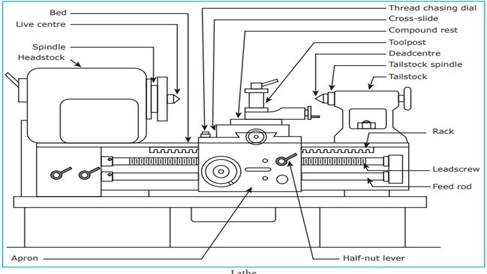
The lathe has bed
on which head stock is mounted on left end, tailstock at right end and carriage
is placed and moved on the bed.
4 Main parts of a lathe
Every individual part performs an important task in a lathe.
Some important parts of a lathe are listed below.
1.
Bed
2.
Headstock
3.
Spindle
4.
Tailstock
5.
Carriage
a.
Saddle
b.
Cross – slide
c.
Compound rest
d.
Compound slide
e.
Tool post
f. Apron
6.
Lead screw
7.
Feed rod
Bed
Bed is mounted on the legs of the lathe which are
bolted to the floor. It forms the base of the machine. It is made of cast iron
and its top surface is machined accurately and precisely. Headstock of the
lathe is located at the extreme left of the bed and the tailstock at the right
extreme. Carriage is placed in between the headstock and tailstock moves on the
bed guide ways.
The top of the bed has a guide ways which is
manufactured in two shapes
1. Flat shaped
2. V – Shaped
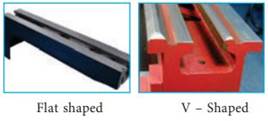
The tailstock and
the carriage slides on these guide ways. Flatbed guide ways can be found in
older machine tools. It is useful in heavy duty machines, handling large work
pieces. Though, it is less accuracy. V-type bed have been found in modern
machine tools. This type of V-bed gives accurate alignment to carriage and
tailstock. The metal chips automatically fall through.
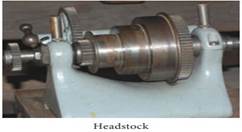
Headstock
Headstock is mounted permanently on the inner
guide ways at the left hand side of the lathe bed. The headstock houses a
hollow spindle and the mechanism for driving the spindle at multiple speeds.
The headstock will have any of the following arrangements for driving and
altering the spindle speeds.
1. Stepped cone pulley mechanism
2. Back gear mechanism
3. Gear box mechanism
Spindle
The spindle freely
rotates on two large bearings housed on the headstock casting. It is made of
carbon or nickel chrome steel. A hole extends through the spindle so that a
long bar stock may be passed through the hold. The front end of the spindle is
threaded on which any one of the work holding devices can be screwed. The front
end of the hole is tapered to receive live centre which supports the work. On
the other side of the spindle, a gear known as a spindle gear is fitted.
Through this gear, tumbler gears and a main gear train, the power is
transmitted to the gear on the lead screw.

Tailstock
Tailstock is
located on the inner guide ways at the right side of the lathe bed. The body of
the tailstock is bored and houses the tailstock spindle. The spindle moves
front and back inside the hole. The spindle has a tapper hole to receive the
dead centre or shanks of tool like drill or reamer. If the tailstock hand wheel
is rotated in clockwise direction, the spindle advances. The spindle will be
reversed inside the hold, if the handwheel is rotated
in anti-clockwise direction.

To
remove the dead centre or any other tool from the spindle, the hand wheel is
rotated in anticlockwise direction further. The movement of the spindle may be
locked by spindle clamp, located on top of the tailstock. To hold different
lengths of work, the tailstock can be adjusted and locked at desired position
on the lathe bed. The casting of the tailstock body is divided into two. The
lower casting of the body can be clamped to the bed. The upper casting can be
moved side wards from lathe axis.
Uses of Tailstock
1.
It supports the right end of the long work piece
when it is machined between centres.
2.
It is useful in holding tools like drills, reamers
and taps when performing drilling, reaming and tapping.
3.
The upper casting of the body is set off by a
small distance from the axis of the lathe to turn tapers on the work pieces.
4.
It is useful in setting the cutting tool at
correct height aligning the cutting edge with lathe axis.
Carriage
Carriage
is located between the headstock and tailstock on the lathe bed guideways. It
can be moved along the bed either towards or away from the headstock. It has
several parts to support, move and control the cutting tool.
The parts
of the carriage are
a. Saddle
b. Cross slide
c.
Compound rest
d. Compound slide
e. Tool post
f.
Apron
Saddle
Saddle connects the
front and back portion of bed guide ways like a bridge. It is an ‘H’ shaped
casting. It moves along the bed between headstock and tailstock. The saddle can
be moved by providing hand feed or automatic feed.
Cross slide
Cross slide is situated on the saddle and
slides on the dovetail guideways at right angles to the bed guideways. It
carries compound rest, compound slide and tool post. The cross slide can be
moved at right angles to the lathe axis by giving hand feed or automatic feed.
Compound rest
Compound
rest is a part which connects cross slide and compound slide. It is mounted on
the top of the cross slide by tongue and groove joint. It has a circular base
on which angular graduations are marked. The compound rest can be swivelled to
the required angle while turning tapers. A top slide known as compound slide is
attached to the compound rest by dove tail joint. The tool post is fixed on the
compound slide.
Tool post
The tool post is mounted on the compound
slide. It is used for holding the cutting tool tightly. According to the
operations on the work piece, tool may be changed and fixed on the tool post.
There are different types of tool post. In which,
1. Single screw tool post
2. Four way tool post are widely used.
Single screw tool post
One tool can be held by the single screw tool
post. The tool is clamped by one clamping screw. A concave ring is found in the
tool post. A convex rocker iron piece has got a convex surface at its bottom
and flat surface at its top. This rocker iron piece is placed on the concave
ring. The tool rests on the top flat surface of the rocker.
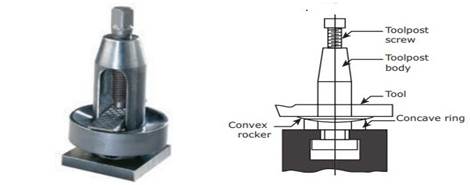
The height of the tool point can be adjusted
by moving the rocker front and back. As the tool is clamped by only one
clamping screw, it is not preferable for heavy duty works.
Four way tool post
Four way tool post is known as Turret tool
post. Four different types of tool can be placed and clamped at a time. The
required tool can be turned towards the work piece for turning
Process.
As the required tools fitted ready in position, the turning work is easier and
faster. This type of tool post is used in heavy duty lathes.

5 Feed Mechanism
By using various
feed mechanism, the rotation of lead screw and feed rod direction can be
changed and so the direction of carriage and cross slide movements can also be
changed. There are so many feed mechanisms used in lathe, among them the
important mechanisms are discussed below.
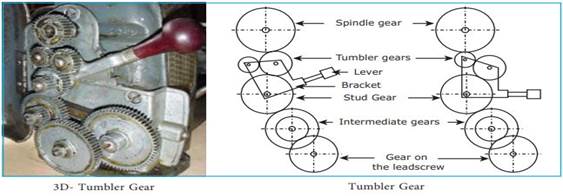
6 Tumbler Gear
A set of two small
gears are placed just below the spindle gear and connected to the spindle gear
in the lathe. The set of gears is known as tumbler gear. The set of two small
tumbler gears are fitted in a bracket. The bracket position can be adjusted
into three positions such as neutral, upwards and downwards. By adjusting the
position of tumbler gear, the rotation of lead screw and feed rods direction
can be changed.
Neutral Position
In this position,
the tumbler gears lever is in the middle position hence, the tumbler gears are
not engaged with spindle gear and the intermediate gears and so, automatic feed
is not received.
Forward position
In this position,
the tumbler gears lever is shifted upward position. Here only one tumbler gear
is in contact with the spindle gear, hence, the lead screw rotates in the same
direction of the spindle rotation. The carriage moves towards headstock.
Reverse Position
In this position,
the tumbler gears lever is pushed downward position. Here leadscrew and feed
rod receive rotational movement from spindle gear through tumbler gears. Hence,
they rotate in opposite direction of the spindle rotation. So the carriage will
move towards tailstock.
7 Apron Mechanism
Apron is attached
to the carriage and hangs over the front side of the lathe bed. It is useful in
providing power and hand feed to both carriage and cross-slide. It is also used
to provide power feed to the carriage during thread cutting through two half
nuts.
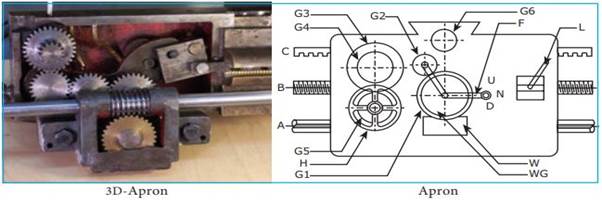
The
gear attached to the spindle is called spindle gear. Feed rod (A) and lead
screw (B) receives rotational movement from spindle gear through the tumbler
gear. Worm (W) and worm gear (WG) mechanism is fixed in worm gear rod (A). One
more gear (G) is fixed in worm gear shaft. Gear G1 and G2
is connected as shown in the figure. Gear G4 is inserted in the rack
gear. Gear G3 is mounted on Gear G4 axis. Handle (H) for
longitudinal feed and gear G5 are mounted on the same axis. Gears G3
and G5 are always connected each other. There is a feed check lever
(F), which can be adjusted into three positions such as neutral, upwards and
downwards so, the following movements can be obtained.
Hand feed to the carriage
Keep the feed check
lever (F) in neutral position and if cross feed wheel is rotated by hand, the
cross slide moves towards the lathe axis.
Automatic feed to the cross slide
When feed check
lever is kept in downward (D), gear G2 will be connected to G6. The rotation of
G6 will make the cross slide to move automatically.
Automatic feed to the carriage for thread cutting
When the two half
nuts in the apron are connected to the leadscrew by using lever (L), leadscrew
makes the carriage to move automatically and cut threads for required pitch
value.
Lead screw
The lead screw is a
long threaded shaft. It is used for moving the carriage automatically to a
calculated distance only when threads have to be cut. Mostly lead screws have
an acme thread.
The leadscrew is
held between two bearing infront of the lathe bed. A gear is attached to the
leadscrew at left end. The gear is called as gear on leadscrews. A half nuts
lever is provided in the apron to engage the halfnuts with the leadscrew.
If the half nuts
are engaged with the running screw the carriage will move automatically. When
the lead screw is kept stationary the carriage is locked at the required
position by using half nuts.
Feed Rod
Feed
rod is placed parallel to the leadscrew infront side of the bed. It is a plain
long shaft which has a keyway along its length. The power is transmitted from
the spindle to the feed rod through tumbler gears and a gear train. It is
useful for providing feed movement to the carriage and cross slide, except
thread cutting time.
8 Spindle Mechanism
The spindle is
located in the headstock and it receives the driving power from the motor. The
spindle speed should be changed to suit different machining conditions like
type of material to be cut, the diameter and the length of the work, type of
operation, the type of cutting tool material used, the type of finish desired
and the capacity of the machine. In order to change the spindle speeds, any one
of the following methods are employed.
1. Stepped
cone pulley mechanism
2. Back gear
mechanism
3. Gear box
mechanism
9 Stepped Cone Pulley Mechanism
It
is simple in construction. A stepped cone pulley is attached with the spindle
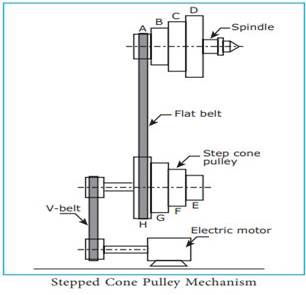
contained within the headstock casting. The cone pulley has four steps (A, B, C
& D). Another cone pulley having four steps (E, F, G and H) is placed
parallel to the spindle cone pulley. Both the cone pulleys are connected by a
flat belt. The belt can be arranged between the steps A & H, B & G, C
& F and D & E. The cone pulley at the bottom is connected to the
electric motor by a ‘V’ – belt. So the cone pulley at the bottom rotates at a
particular speed.
The belt is arranged on any one
of the four steps to obtain different spindle speeds. If the belt is placed on
the smaller step of the driven pulley, the spindle speed will be increased. For
example, when the belt is arranged between A & H the spindle speed will be maximum.
When it is between D & E, the speed will be minimum. Stepped cone pulley
drive is illustrated in figure.
10 Back gear mechanism
Back gear mechanism is housed within the
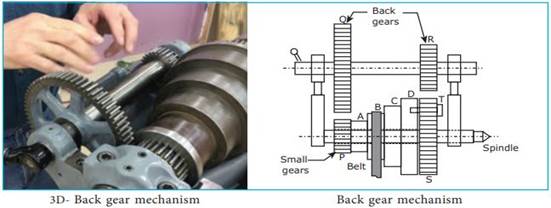
headstock of the lathe. A step cone pulley having steps ABCD and a small pinion
‘P’ are mounted on the spindle and rotates freely on it. The gear ‘S’ is keyed
to the head stock spindle. So the spindle will rotate only when the gear ‘s’ rotates.
The
step cone pulley ABCD and the gear ‘S’ can be kept separately or made as one
unit with the help of a pin ‘T’ when the pin is disengaged, the cone pulley
along with the gear P will rotates freely on the spindle and the spindle will
not rotate. There is another shaft parallel to the spindle axis having back
gear Q and R mounted on it. These back gears can be made to mesh with gears ‘P’
and ‘S’ or kept disengaged from them. The spindle can get drive either from the
cone pulley or through back gears.
Drive from step cone pulley
When the spindle
gets from the cone pulley, the back gears Q and R are
disengaged from the gears P and S. The pin ‘T’ is engaged with cone pulley. The
belt can be arranged on the steps ABC or D to get four different direct speeds
for the spindle.
Drive through back gears
Back
gears Q and R are engaged with gears P and S. The pin ‘T’ is disengaged from
the cone pulley to make the cone pulley and the spindle separate units. When
the cone pulley gets drive through the belt, the power is transmitted through
the gears P, Q and R to the gear S, because of number of teeth on these gears,
the spindle rotates at slower speeds. By arranging the belt on the different
steps of the cone pulley, four different spindle speeds are obtained.
Uses of back gear arrangement
1. It is
used for reducing the spindle speed, when turning on lager diameter of the work
pieces and cutting coarse threads.
2. Eight
different types of spindle speed can be obtained by this mechanism.
11 Gear Box Mechanism
Modern lathes are equipped with
all geared headstocks to obtain different spindle speeds quickly. Casting of
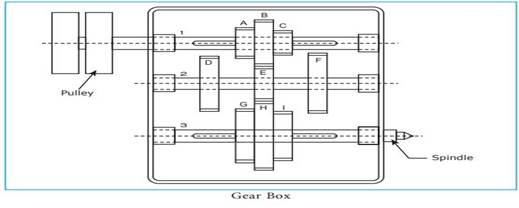
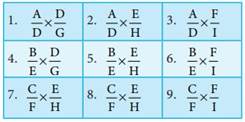
the all geared headstock has three shafts (1, 2 & 3) mounted within it. The
intermediate shaft (2) has got three gears D, E and F and rotates at the same
place and cannot move. The shaft (1) which is above the intermediate shaft has
got three set of gears A, B and C mounted on it by keys. These three set of
gears can be made to slide on the shaft with the help of a lever. This movement
enables the gear A to have contact with the gear D or the gear B with gear E or
the gear C with the gear F.
Likewise
the spindle shaft (3) which is also splined has three set of gears G, H and I.
These three set of gears can be made to slide on the shaft by lever. This
sliding movement enables the gear G to have contact with gear D or the gear H
with the gear E or the gear I with the gear F. By altering the position of the
six gears namely A, B, C, G, H and I the following arrangements can be made
within the headstock. Nice different spindle within the headstock. Nine
different spindle speeds are obtained.
12 Types of lathe
Various designs and
constructions of lathe have been developed to suit different machining
conditions and usage. The following are the different types of lathe.
1. Speed
lathe
a. Cantering lathe
b. Wood working lathe
c. Polishing lathe
d. Metal spinning lathe
2. Bench
lathe
3. Tool room
lathe
4. Semi-Automatic
lathe
a. Capstan lathe
b. Turret lathe
5. Automatic
lathe
6. Special
purpose lathe
a. Wheel lathe
b. Gap bed lathe
c. T – lathe
d. Duplicating lathe
Speed lathe
Spindle of a speed lathe operates
at very high speeds (approximately at a range of 1200 to 3600 rpm) and so it is
named so. It consists of a headstock, a tailstock, a
bed and tool slide only. Parts like leadscrew, feed rod and apron are not found
in this type of lathe.
1. Centering
lathes are used drilling centre holes.
2. The wood
working lathes are meant for working on wooden planks.
3. Metal
spinning lathes are useful in making tumblers and vessels from sheet
metal.
4. Polishing
of vessels is carried out in polishing lathe.
Bench lathe
Bench lathe is a small lathe
generally mounted on a bench. It consists of all the parts of an engine lathe.
It is used for small works like machining tiny and precise parts and parts of
measuring instruments.
Tool room lathe
A tool room lathe has similar features of an engine lathe but
is accurately built and has wide range of spindle speeds to perform precise
operations and different feeds. It is costlier than a centre lathe. This is
mainly used for precision works like manufacturing tools, dies, jigs, fixtures
and gauges.
Semi-Automatic lathe
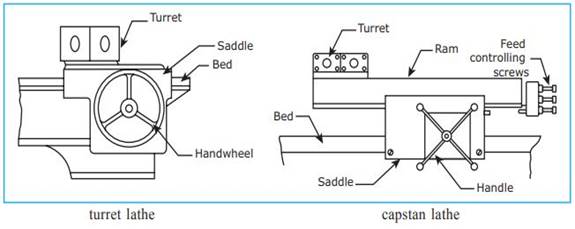
Turret
and capstan lathes are known as semi-automatic lathes. These lathes are used
for production work where large quantities of identical work pieces are
manufactured. They are called semiautomatic lathes as some of the tasks are
performed by the operators and the rest by the machines themselves.
There
are two way tool posts in the machine namely four way tool post and rear tool
post. Four tools can be mounted on the four way post and parting tool is
mounted on the rear tool post. The tailstock of an engine lathe is replaced by
a hexagonal turret. As many tools may be fitted on the size side of the turret,
different types of operations can be performed on a work piece without
resetting of tools.
Advantages
1. Machining
operations can be done in this machine by semi-skilled operators.
2. Large
quantity of product can be produced quickly.
3. The cost
of production is less.
Automatic lathe
Automatic
lathes are operated with complete automatic control. They are high speed, mass
production lathe. An operator can took after more than are automatic lathe at a
time.
Special purpose lathe
Special
purpose lathes are used for special purposes and for jobs, which cannot be
accommodated and conveniently machined on a standard lathe. Wheel lathe, ‘T’
lathe duplicating lathe are some examples of special purpose lathe.
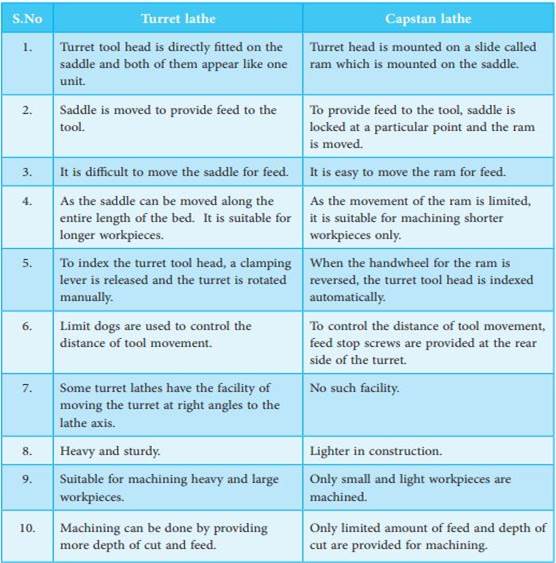
13
Differences between a turret lathe and a capstan lathe
14 Specification of lathe
The size of a lathe is specified by the following points
1. The
length of the bed.
2. Maximum
distance between live and dead centres.
3. The
height of centres from the bed.
4. The swing
diameter
a.
The swing diameter over bed –
It
refers to the largest diameter of the work that will be rotated without
touching the bed.
b.
The swing diameter over carriage –
It
refers to the largest diameter of the work that will revolve over the saddle.
5. The bore
diameter of the spindle.
6. The width
of the bed.
7. The type
of the bed.
8. Pitch
value of the lead screw.
9. Horse power of the motor.
10.
Number and range of spindle speeds.
11. Number of
feeds.
12. Spindle
nose diameter.
13. Floor
space required.
14. The type
of the machine.
15 Work Holding Devices used in a lathe
The work holding
devices are used to hold and rotate the work pieces along with the spindle.
Different work holding devices are used according to the shape, length,
diameter and weight of the work piece and the location of turning on the work.
They are,
1. Chucks
2. Face
plate
3. Driving
plate
4. Catch
Plate
5. Carriers
6. Mandrels
7. Centres
8. Rests
Chucks
Work
pieces of short length, large diameter and irregular shapes, which cannot be
mounted between centres, are held quickly and rigidly in chuck. There are
different types of chucks namely, three jaw universal chuck, four jaw
independent chuck, Magnetic chuck, Collect chuck and Combination chuck.
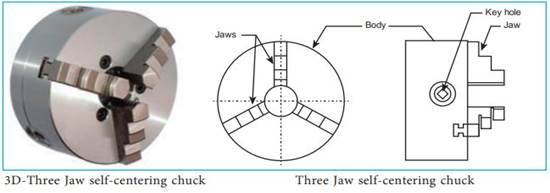
Three Jaw self-cantering chuck
The three jaws
fitted in the three slots may be made to slide at the same time by an equal amount
by rotating any one of the three pinions by a chuck key. This type of chuck is
suitable for holding and rotating regular shaped work pieces like round or
hexagonal rods about the axis of the lathe.
Advantages
1. The work
is held simply and quickly because of the three jaws are moved to slide at the
same time.
2. So, time
is saved.
3. It is
suitable for apprentice.
Disadvantage
1.
Work pieces of irregular shapes cannot be held by
this chuck.
Four jaw independent chuck
There are four jaws in this
chuck. Each jaw is move independently by rotating a screw with the help of a
chuck key. A particular jaw may be moved according to the shape of the work.
Hence this type of chuck can hold works of irregular shapes. Concentric circles
are inscribed on the face of the chuck to enable quick cantering of the work
piece.

Disadvantages
1. It
requires more time to set the work aligned with the lathe axis because each jaw
is moved independently.
2. Experienced
turners can set the work about the axis quickly.
Magnetic chuck
The holding power of this chuck
is obtained by the magnetic flux radiating from the electromagnet placed inside
the chuck. Magnets are adjusted inside the chuck to hold or release the work.
Work piece made of magnetic material only are held in this chuck. Very small,
thin and light works which cannot be held in an ordinary chuck are held in this
chuck.

Face plate
Face plate is used to hold large,
heavy and irregular shaped work pieces which cannot be conveniently held
between centres. It is circular disc bored out and threaded to fit to the nose
of the lathe spindle. It is provided with radial plain and ‘T’ – slots for
holding the work by bolts and clamps.

Driving plate
The
driving plate is used to drive a work piece when it is held between centres. It
is a circular disc screwed to the nose of the lathe spindle. It is provided
with small bolts or pins on its face. Work pieces fitted inside straight tail
carriers are held and rotated by driving plates.

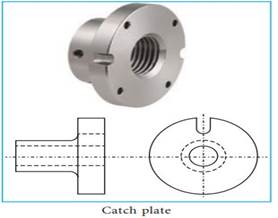
Catch plate
When
a work piece is held between centres, the catch plate is used to drive it. It
is a circular disc bored and threaded at the centre. Catch plates are designed
with ‘U’- slots or elliptical slots to receive the bent tail of the carrier.
Positive drive between the lathe spindle and the workpiece
is affected when the work piece fitted with the carrier fits into the slot of
the catch plate.
Carrier
When a work piece is held and
machined between centrers, carriers are useful in
transmitting the driving force of the spindle to the work by means of driving
plates and catch plates. The work is held inside the eye of the carrier and
tightened by a screw. Carriers are of two types and they are:
1.
Straight tail carrier
2. Bent tail
carrier
Straight tail
carrier is used to drive the work by means of the pin provided in the driving
plate. The tail of he bent tail carrier fits into the slot of the catch plate
to drive the work.

Mandrel
A
previously drilled (or) bored work piece is held on mandrel to be driven in a
lathe and machined. There are centre holes provided on both faces of the
mandrel. The live centre and the dead centre fit into the centre holes. A
carrier is attached at the left side of the mandrel. The mandrel gets the drive
either through a catch plate or a driving plate. The work piece rotates along
with the mandrel. There are several types of mandrels and they are:
1. Plain
mandrel
2. Step
mandrel
3. Gang
mandrel
4. Screwed
mandrel
5. Collar
mandrel
6. Cone
mandrel
7. Expansion
mandrel
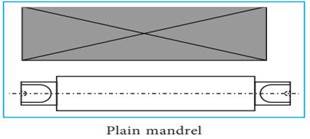
Plain mandrel
The body of the plain mandrel is slightly
tapered to provide proper gripping of the work piece. The taper will be around
1 to 2 mm for a length of 100 mm. It is also known as solid mandrel. This type
is mostly commonly used and has wide application.
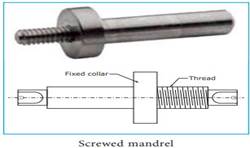
Screwed mandrel
It is
threaded at one end and a collar is attached to it. Work pieces having internal
threads are screwed on to it against the collar for machining.
Centres
Centres are useful in holding the work in a
lathe between centres. The shank of a centre has morse taper on it and the face is conical in shape.
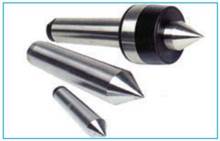
There are two types of centres namely
1.
Live centre
2.
Dead centre
Live centre
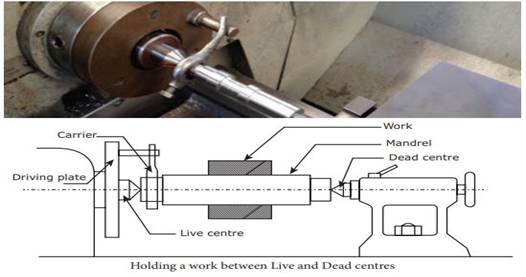
The live centre is fitted on the headstock spindle
and rotates with the work.

Dead centre
The centre fitted
on the tailstock spindle is called dead centre. It is useful in supporting the
other end of the work. Centres are made of high carbon steel and hardened and
then tempered. So the tips of the centres are wear resistant. Different types
of centres are available according to the shape of the work and the operation
to be performed.

Holding a
work between Live and Dead centres
Rests
A rest is a mechanical device to support a
long slender work piece when it is turned between centres or by a chuck. It is
placed at some intermediate point to prevent the work piece from bending due to
its own weight and vibrations setup due to the cutting force. There are two
types of rests
1.
Steady rest
2.
Follower rest
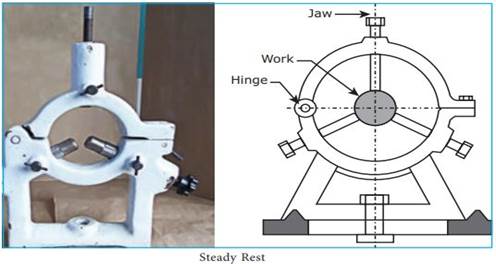
Steady rest
Steady
rest is made of cast iron. It may be made to slide on the lathe bed ways and
clamped at any desired position where the work piece need support. It has three
jaws. These jaws can be adjusted according to the diameter of the work.
Machining is done upon the distance starting from the headstock to the point of
support of the rest. One or more steady rests may be used to support the free
and of a long work.
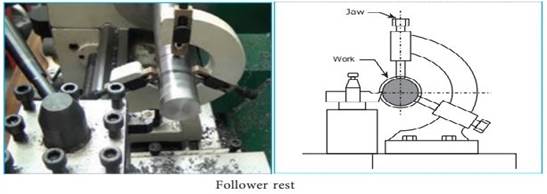
Follower rest
It consists
of a ‘C’ like casting having two adjustable jaws to support the work piece. The
rest is bolted to the back end of the carriage. During machining, it supports
the work and moves with the carriage. So, it follows the tool to give
continuous support to the work to be able to machine along the entire length of
the work.
16 Cutting speed, Feed and Depth of cut in lathe
The cutting speed
is the distance travelled by a point on the outer surface of the work is one
minute.
It is expressed in
meters per minute.
Cutting speed = ![]() m/min
m/min
Where, D – is the
diameter of the work in mm
N – is
the r.p.m of the work.
Feed
The feed of a
cutting tool in a lathe work is the distance the tool advance for each
revolution of the work.
Feed is expressed in millimetres per revolution.
Depth of cut
The depth of cut is
the perpendicular distance measured from the machined surface to the uncut
surface of the work piece. It is expressed in millimeters.
In a lathe, the depth
of cut is expressed as follows
Depth of cut = d1
-d 2 /2 ,
Where,
d1 – diameter of the work surface before
machining
d2 – diameter of the machined surface
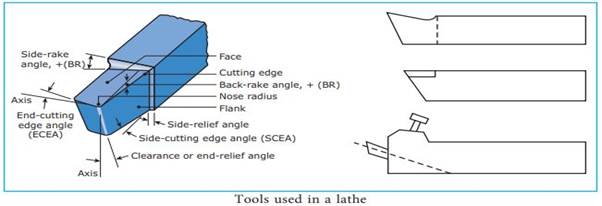
17 Tools used in a lathe
Tools used in lathe are classified as follows
A. According to the construction, the lathe tools are
classified into three types
1. Solid
tool
2. Brazed
tipped tool
3. Tool bit
and tool holders
B. According to the operation to be performed, the cutting
tools are classified as
1. Turning
tool
2. Thread
cutting tool
3. Facing
tool
4. Forming tool
5. Parting tool
6. Grooving tool
7. Boring tool
8. Internal thread cutting tool
9. Knurling tool
C. According to the direction of feed movement, the following
tools are used
1. Right
hand tool
2. Left hand
tool
3. Round
nose tool
18 Operations performed in lathe
Various operations are performed in a lathe other than plain
turning.
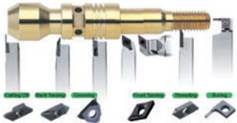
There are
1.
Facing
2.
Turning
a. Straight
turning
b. Step
turning
3.
Chamfering
4.
Grooving
5.
Forming
6.
Knurling
7.
Under cutting
8.
Taper
turning
9.
Thread
cutting
Other works are done in lathe
1. Drilling
2. Reaming
3. Boring
4. Grinding
5. Milling
6. Key ways
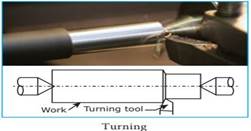
Turning
The work is turned
straight when it is made to rotate about the lathe axis. The purpose of turning
is to produce a cylindrical surface by removing excess metal from the work
piece.
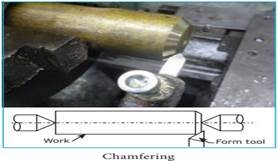
Chamfering
Chamfering is the
operation of bevelling the extreme end of the work piece. The form tool used
for taper turning may be used for this purpose. Chamfering is an essential
operation after thread cutting so that the nut may pass freely on the threaded
work piece.
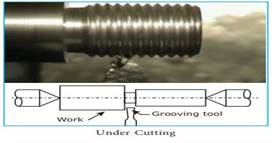
Undercutting
Undercutting is done
1. At the
end of a hole
2. Near the
shoulder of stepped cylindrical surfaces
3. At the
end of the threaded portion in bolts
It
is a process of enlarging the diameter if done internally and reducing the
diameter if done externally over a short length. It is useful mainly to make
fits perfect. Boring tools and parting tools are used for this operation.
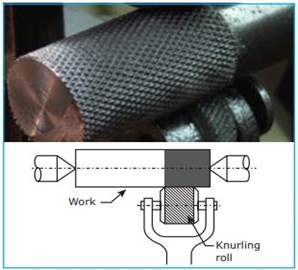
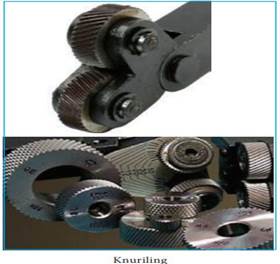
Knurling
Knurling
is the process of embossing a diamond shaped pattern on the surface of the work
piece. The knurling tool holder has one or two hardened steel rollers with
edges of required pattern. The tool holder is pressed against the rotating
work. The rollers emboss the required pattern. The tool holder is fed
automatically to the required length. Knurls are available in coarse, medium
and fine pitches. The patterns may be straight, inclined or diamond shaped.
The purpose of knurling is
1. To provide an effective gripping surface.
2. To provide better appearance to the work.
3. To slightly increase the diameter of the work.
19 Taper turning
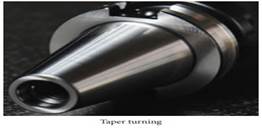
Taper
A taper may be
defined as a uniform increase or decrease in diameter of a piece of work
measured along its length.
Taper turning method
1. Form tool
method
2. Compound
rest method
3. Tailstock
set over method
4. Taper
turning attachment method
5. Combined
feed method
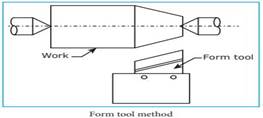
Form tool method
A
broad nose tool is ground to the required length and angle. It is set on the
work by providing feed to the cross slide. When the tool is fed into the work
at right angles to the lathe axis, a tapered surface is generated.
This
method is limited to turn short lengths of taper only. The length of the taper
is shorter than the length of the cutting edge. Less feed is given as the
entire cutting edge will be in contact with the work.
Compound Rest Method
The
compound rest of the lathe is attached to the circular base graduated in
degrees, which may be swiveled and clamped at any desired angle. The angle of
taper is calculated using the formula.
![]()
Where,
D – Larger diameter
d
– Small diameter
l
– Length of the taper
The compound is swiveled to the angle as above and clamped.
Feed is given to the compound slide to generate the required taper.

Advantage
Taper turning can
be done on outer surface of the work piece and inner surface of the hole.
Disadvantage
1. This
method is not suitable for long work piece, because compound slide moves only
small distance.
2. This method
is done manually so, it takes more time and the productivity is less.
Tailstock set over method
Turning
taper by the set over method is done by shifting the axis of rotation of the
work piece at an angle to the lathe axis and feeding the tool parallel to the
lathe axis. The construction of tailstock is designed to have two parts namely
the base and the body. The base is fitted on the bed guide ways and the body
having the dead centre can be moved at cross to shift the lathe axis.
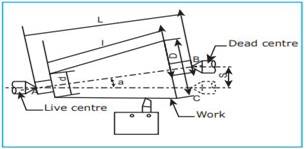
The amount of set over-S, can be calculated as follows
![]()
Where, S – Amount of set over
D – Larger diameter
d – Smaller
diameter
L – Length of the
work
l – Length of the
taper
The dead centre is suitably
shifted from its original position to the calculated distance. The work is held
between centres and longitudinal feed is given by the carriage to generate the
taper.
Advantages
1. Taper
turning can be done to full length of the work piece.
2.
Taper thread cutting can also be cut in this
method.
Disadvantages
1. This type
of taper turning can be done up to angle of 80.
2. Internal taper turning cannot be done by this
method.
20 Thread Cutting
Thread
cutting is one of the most important operations performed in a lathe. The
process of thread cutting is to produce a helical groove on a cylindrical
surface by feeding the tool longitudinally.

1. The job
is revolved between centres or by a chuck. The longitudinal feed should be
equal to the pitch of the thread to be cut per revolution of the work piece.
2. The
carriage should be moved longitudinally obtained feed through the leadscrew of
the lathe.
3. A
definite ratio between the longitudinal feed and rotation of the head stock
spindle should be found out. Suitable gears with required number of teeth
should be mounted on the spindle and the leadscrew.
Calculation
for change – gear
![]()
By using the above
formula, calculate the thread to be cut and connect the gear on the spindle and the gear on leadscrew.
4.
A proper thread cutting tool is selected according
to the shape of the thread. It is mounted on the toolpost
with its cutting edge at the lathe axis and perpendicular to the axis of the
work.
5. The
position of the tumbler gears are adjusted according to the type of the thread
(right hand or left hand).
6. Suitable
spindle speed is selected and it is obtained through back gears.
7. Half nut
lever is engaged at the right point as indicated by the thread chasing dial.
8. Depth of
cut is set suitably to allow the tool to make a light cut on the work.
9. When the cut is made for required length, the
half nut lever is disengaged. The carriage is brought back to its original
position and the above procedure is repeated until the required depth of the
thread is achieved.
10.
After the process of thread cutting is over, the
thread is checked by suitable gauges.